Why Sealant Bubbles Appear and How to Avoid Them

Sealant bubbles ruin a clean joint and weaken the seal. Tiny air pockets or gas blisters show up during cure or hours later. Fix the cause, not just the symptom. Here’s what decades of shop floor troubleshooting reveal.
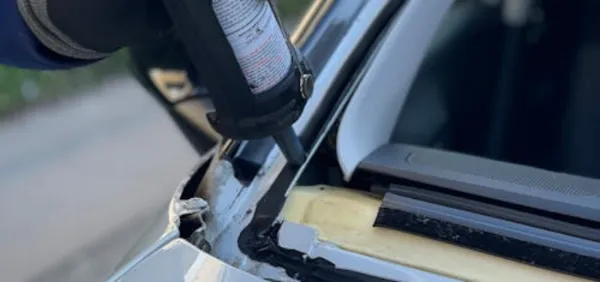
How Bubbles Form During Application
Air gets trapped or gas gets made. That’s it. When the bead hits the surface, a skin starts to form. Anything underneath, air from the gun, vapor from a damp wall, or CO₂ from a reacting hardener, can’t escape fast enough. Pressure builds. Pop. A bubble. Sometimes the bubble stays soft and collapses later, leaving a pinhole. Other times it hardens and stares back at you.
When Do Bubbles Usually Appear
Hot summer afternoons top the list. Substrate at 35 °C, cartridge straight from the van, recipe for trouble. Thick beads over 10 mm act the same way; the outside cures, the inside keeps fizzing. Porous concrete that drank yesterday’s rain is another regular offender. The water turns to steam and pushes out.
At Kingdeli, decades of experience in sealant formulation help engineers identify the root causes behind these application defects.
Common Causes of Bubbles in Sealants
Moisture Contamination
Damp brick, wet fingers, morning dew on metal, any water reacts with certain chemistries. Silicone gives off acetic acid vapor; polyurethane releases CO₂. Both expand inside the curing mass. One drop of water in a 300 ml cartridge can create dozens of visible bubbles.
Improper Mixing or Over Aggitation
Two part polyurethanes and some MS polymers need mixing. Spin too fast or too long and you whip in air. Those microscopic bubbles grow as the material thickens. A slow figure eight motion for 30 seconds works better than a drill at 600 rpm.
Application on Hot or Porous Surfaces
Heat speeds skin over. Air trapped below has no exit. Porous block sucks the sealant in, then releases fine air streams as the polymer wets out. Result: a wormy, pitted line that looks like Swiss cheese under magnification.
Incompatible Primers or Substrate Materials
Some acrylic sealants hate solvent based primers. The solvent flashes off and leaves micro channels. Galvanized steel with leftover pickling acid does the same, tiny hydrogen bubbles form at the interface.
How to Prevent Sealant Bubbles Before Application
Control Environmental Conditions
Keep substrate and air between 15 °C and 25 °C. Relative humidity below 70 %. A simple digital thermo hygrometer costs less than one failed joint. In humid climates, run a dehumidifier the night before.
Proper Surface Preparation
Wipe with isopropyl alcohol, let it flash off completely. Vacuum dust. On concrete, etch or prime only after 28 day cure and moisture test below 4 %. Dry is non negotiable.
Apply in Controlled Thickness
One pass, 6–8 mm deep, 10–12 mm wide. Tool immediately with light pressure. Second layer only after the first skins over, usually 20 minutes. Thin layers let gas migrate out before the surface locks.
Use High Quality, Well Formulated Sealants
Low void formulations matter. Some silicones include built in defoamers; MS polymers cure with almost no by product gas.
Kingdeli’s silicone sealants and MS polymer sealants are engineered to minimize bubble formation through optimized curing chemistry.
What to Do If Bubbles Already Appear
Inspect and Identify the Root Cause
Cut a cross section with a razor. Soft center with big voids, moisture. Tiny uniform spheres, mixing air. Sharp edged craters, hot substrate. Match the pattern to the cause.
Remove and Reapply If Necessary
Slice out the bad bead with a sharp blade. Clean the joint flanks with a wire brush and solvent wipe. Wait until surfaces return to recommended temperature. Reapply in thinner lifts. A second failure usually means the substrate still holds moisture, test it.
Consult Technical Experts for Specific Issues
Phone the manufacturer with batch number, substrate photo, and weather log. Most labs answer within a day.
Kingdeli’s technical support team often helps clients troubleshoot field problems, ensuring stable results even in complex applications.
Best Practices for Long Term Bubble Free Sealing
Choose the Right Product for Each Substrate
Neutral cure silicone on glass and aluminum. Polyurethane on concrete and wood. MS polymer when movement exceeds 25 %. Acrylic latex only for dry interior paintable gaps. Match elongation and adhesion specs, data sheets list them plainly.
Follow Correct Storage and Handling Procedures
Store cartridges upright between 10 °C and 25 °C. Rotate stock; six month shelf life is common. Wipe nozzle threads clean before capping. A dusty nozzle is an air injector in disguise.
Perform Small Scale Testing Before Full Application
Bead 30 cm on scrap material from the same batch of concrete or metal. Cure 24 hours under job site lamps. Slice and check. Ten minutes of testing saves hours of rework.
Conclusion: Achieving Reliable Results with the Right Approach
Bubbles come from air, water, heat, or chemistry gone wrong. Control moisture, mix gently, keep temperatures moderate, and pick the sealant designed for the job. Preparation beats repair every time.
With early 30 years of experience, Kingdeli continues to refine sealant formulations that deliver consistent, smooth finishes across construction, automotive, and industrial applications. Understanding the causes and applying these practical steps will help professionals achieve long term, reliable sealing performance.
FAQ
Q: Can I pop bubbles with a needle after the sealant skins?
A: No. The hole stays and water finds it later. Remove the entire bead and start over.
Q: Will low temperature application stop bubbles?
A: It slows curing and gives trapped air more time to escape, but below 5 °C most sealants won’t cure at all. Stay within the printed range.
Q: Is expensive sealant always bubble free?
A: Price doesn’t guarantee performance. Check the technical data sheet for “low void” or “non bubbling” claims and follow the instructions.
Q: My silicone smells like vinegar and still bubbles. Normal?
A: Acetic cure releases vapor. If substrate is porous and damp, bubbles are expected. Switch to neutral cure on sensitive surfaces.
Q: How thick is too thick?
A: Over 12 mm in one pass almost guarantees trapped gas. Build in layers with proper inter coat timing.