Sealant Sample Testing Checklist for Importers

A sealant may look good when it arrives. The cartridge design may be clean. The paste may feel smooth at first touch. The price may also look attractive. The better question is: “Can this sealant perform well in the local market, on real materials, and under real jobsite conditions?”
KINGDELI sees sample testing as an important part of responsible sourcing. A clear checklist helps buyers compare products in a practical way before confirming a bulk order, OEM packaging, or long-term supply plan.
Why Sealant Sample Testing Matters for Importers
Sealants are not ordinary products. They are used for sealing, bonding, waterproofing, vibration resistance, gap filling, and surface protection in many construction and industrial applications. A small product failure may lead to water leakage, joint cracking, poor adhesion, stained surfaces, or complaints from installers. A well established sealant sample testing process can help you reduce risks before bulk purchasing.
1. Check Packaging, Label, Cartridge, and Carton Quality
Packaging is the first thing dealers, contractors, and retail customers see. If the printing is unclear, the cartridge feels weak, or the carton information is wrong, the product may lose trust before anyone tests the sealant inside.
What You Should Inspect
- Cartridge or sausage pack printing quality
- Logo size, color, and position
- Product name and model number
- Net volume and color marking
- Manufacturing date area and shelf life
- Cap, nozzle, and cartridge body strength
- Barcode and safety information
- Carton printing, lot number, and shipping mark
- Label language accuracy for the target market
Once mass printing starts, label mistakes can become expensive to correct. A good manufacturer should help confirm artwork, product information, carton marks, and packaging details before production.
2. Test Extrusion Smoothness and Application Feel
After packaging inspection, the next step is to test extrusion. This is one of the first things contractors notice when using a sealant.
Simple Extrusion Test Method
Use the same conditions for all samples:
- Keep all samples at the same room temperature.
- Use the same sealant gun.
- Cut each nozzle at the same angle and opening size.
- Apply a continuous bead on a flat surface.
- Compare flow, pressure, stringing, and bead shape.
During the test, ask a few practical questions.
- Does the sealant flow evenly?
- Does the bead break? Is the paste too hard to push?
- Does it form long strings after stopping?
- Does it look easy for installers to use for a full working day?
Extrusion smoothness is not only about comfort. It affects material waste, working speed, joint appearance, and customer feedback.
3. Check Skin Formation Time and Cure Rate
Skin formation time means how long it takes for the surface to form a non-sticky skin after application. Cure rate means how quickly the sealant cures from the outside to the inside. These two points are different.
Why Skin Time Matters
When the skin time happens too quickly, workers often lack the required minutes to tool the joint. Conversely, a prolonged period creates other issues. Dirt can easily grab onto the wet area. This situation often delays the entire job.
You can check this skin time yourself. First, squeeze a standard bead onto a clear area. Next, begin tracking the clock. Lightly press the product every few minutes. You should use a fresh instrument or a gloved hand for this step. Finally, note the exact moment the surface stops transferring any residue.
Why Cure Rate Matters
To check the cure rate, apply a heavy bead. Wait for 24 or 48 hours. Next, slice the material open. Look closely at the center. See if the inside stays wet. It might also feel soft or remain uncured. Many different things change the curing process. Heat and moisture levels have a big impact.
The size of the bead matters too. Furthermore, the specific sealant chemistry plays a major role. Because of these factors, always evaluate samples in your actual work environment. Do not depend completely on a standard technical data sheet.
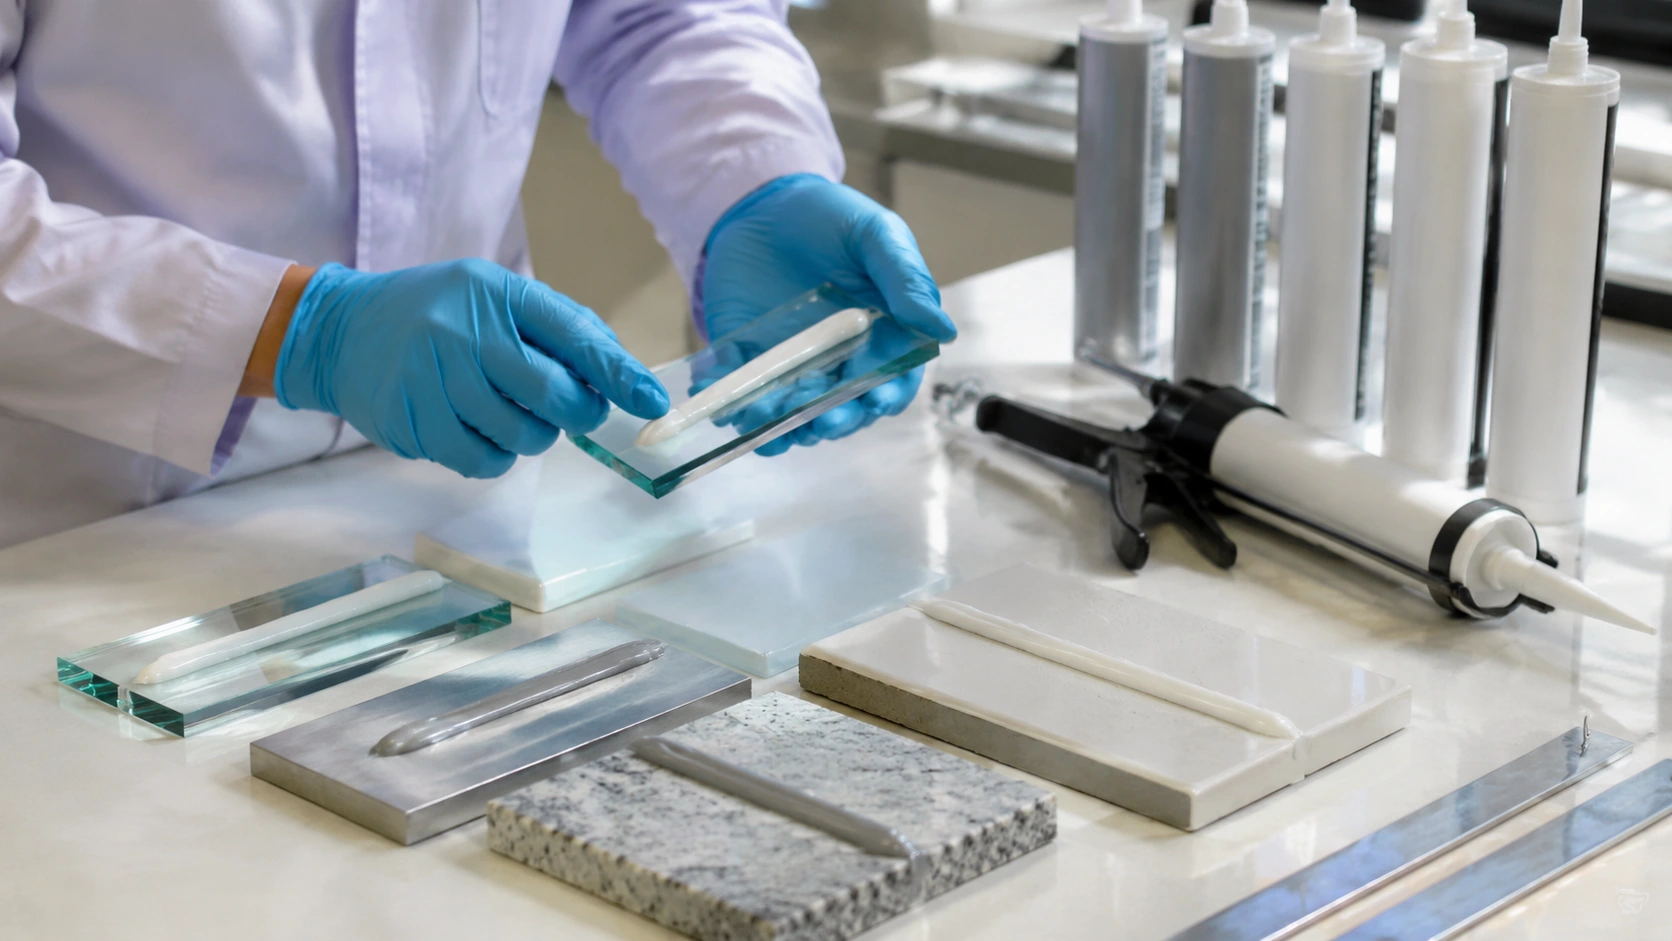
4. Test Adhesion on Local Substrates
Adhesion is one of the most important parts of sealant sample testing. A sealant can only perform well when it bonds properly to the actual materials used in the market.
Recommended Substrates to Test
Depending on the product type, importers can test adhesion on:
- Glass and tempered glass
- Aluminum and coated aluminum
- PVC window profiles
- Ceramic tile and porcelain
- Concrete and masonry
- Stainless steel and galvanized steel
- Marble, granite, and natural stone
- Wood, panels, and composite materials
Simple Peel Test
- A basic peel test can already show many early problems:
- Clean the substrate surface.
- Apply a 5–8 mm bead.
- Allow the sealant to fully cure.
- Cut one end of the cured bead.
- Pull it back slowly and observe the failure mode.
If the sealant tears inside itself, this usually shows stronger bonding. If it separates cleanly from the surface, there may be a compatibility problem, surface preparation issue, or primer requirement.
5. Review Sag Resistance, Tooling, and Surface Finish
For vertical joints, façade gaps, window frames, bathroom corners, and panel seams, the sealant should stay where it is applied. If it slowly slides down after application, the joint will look uneven and the installer may need rework.
What to Check During Application
Apply the sample on a vertical board and observe the bead:
- Does it slump downward?
- Does it keep its original shape?
- Can it be tooled smoothly?
- Does it drag or tear during tooling?
- Are the joint edges clean?
- Does the surface remain smooth after curing?
A sealant may look fine inside the cartridge, but the real judgment starts when it is applied to a joint. For construction markets, surface finish is also part of product quality because end users often judge the finished joint by appearance first.
6. Check Odor, Paintability, and Special Application Risks
Different sealants are used in different places, so you should not test every product in the same way. A bathroom sealant, a window sealant, a construction adhesive, and a stone sealant may need different testing points.
Odor Test
Odor matters for indoor applications, especially bathrooms, kitchens, hotels, schools, homes, and interior decoration. During testing, check whether the smell is strong during application and whether it remains after curing.
Paintability Test
Not every sealant is paintable. When you seal interior joints, wall gaps, skirting boards, or trim areas, wait for the material to fully cure. After that, apply your local paint system. Next, carefully inspect the surface. You need to look for cracking, peeling, poor adhesion, or any color changes.
Professionals often select acrylic sealant for these paintable tasks. Certain MS sealant products are also a good choice here. However, many silicone sealants are simply not suitable for painting. Ultimately, your final decision must rely on official product data. We always recommend doing an actual test first.
Natural Stone Staining Test
For marble, granite, limestone, and other porous stone materials, staining risk should not be ignored. Apply the sealant along the stone edge and leave it for several days. Then check whether dark marks, oil halos, or color changes appear around the joint.
This small test can help you avoid serious complaints in stone, bathroom, countertop, and façade projects.
Documents Importers Should Request Before Approval
Sample testing should be supported by documents. Before confirming a bulk order, you should request basic technical and commercial information from the supplier.
Useful documents include:
- Technical Data Sheet
- Safety Data Sheet / MSDS
- Product specification
- Application instructions
- Shelf life and storage conditions
- Packaging specification
- Available color list
- Test reports when required
- COA for specific orders if needed
They are also useful for customs clearance, dealer training, and project communication.
Final Thoughts: A Good Sample Test Makes Bulk Orders Safer
Testing a sealant sample is never just a simple routine. Instead, it offers a real method to see if an item fits the buyer’s specific region. It also checks the exact use, local weather, base materials, and what users actually expect. A solid review guide lets purchasers see past basic costs and simple looks.
You might need silicone sealants, acrylic sealants, or polyurethane sealants. Perhaps you want MS sealants, RTV sealants, or construction adhesives. In any case, KINGDELI is ready to help. We guide you through picking the right types and planning the wrappers. We also match the exact formulas and check all technical details before mass manufacturing starts.
Reach out to us today to ask for the right sealant and adhesive samples tailored to your local market and daily project applications.
FAQs
Q: What should importers test first when receiving sealant samples?
Start with packaging, extrusion smoothness, skin time, curing, adhesion, and substrate compatibility.
Q: Why is local substrate testing important for sealants?
Because sealant adhesion can change on glass, aluminum, concrete, stone, tile, or coated metal.
Q: Should importers rely only on a sealant TDS?
No. TDS helps, but real sample testing confirms actual market suitability.